


The Fight Caves - An Overview
+4
This Land
Syllabic
Avallan
twobviku
8 posters
Page 1 of 1

The Fight Caves - An Overview
![]() by twobviku Wed Jun 24, 2020 5:03 pm
by twobviku Wed Jun 24, 2020 5:03 pm
The Fight Caves
The fight cave is the first difficult challenge for a med level. You’ve gotten maybe 70+ Range and you feel like you are ready to take on this huge challenge. I myself recently went through this, and have since done a second trip during a slayer task, this by no means necessary makes me an expert, but I figured I would share what knowledge I have, and hopefully others will share their knowledge in the subsequent comments in this thread. Knowledge that I gained from watching a lot of YouTube content especially the video[OSRS] In-Depth JAD Guide (Fast + Easy Fire Cape) by Seerz, which I have also used to write this overview. So if you prefer to watch a video, then I would strongly urge that you watch that.
Link to video: https://www.youtube.com/watch?v=STLlZ3i-58c
What is it?
So first of all, what are the fight caves? The fight caves are a challenge that consists of 63 waves of increasing difficulty. The first wave consists of only a single weak ‘bat’ while the final wave sees you facing off against the, for new players, challenging TzTok-Jad, or simply Jad for short.

Requirements
So first off all, the stat requirements, theoretically there are none, the fight caves have been done by players at all levels. However for my first kill I was 75 ranged and 65 defense.
I waited until I was able to purchase a Blowpipe, which not only made my attempts faster, it also just felt better.
You are also going to want AT LEAST 43 prayer for the overhead protection prayers. Ideally you want it to be a bit higher than that, as that allows Prayer pots and Restores to restore more prayer.
The Gear
Let's talk about the gear, and I figured I would show you the setup I used for when I first managed to complete it.
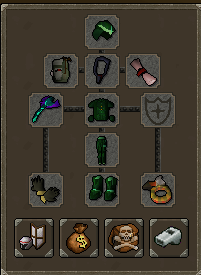
So let's break it down.
Head slot: Slayer Helmet (i)* > God d’hide helmet
Cape Slot: Ava’s Device, there really isn’t any substitution for this, except for a ranging cape.
Amulet slot: Necklace of Anguish > Fury > Glory
Blessing/Arrow slot: Rada’s blessing 4 > Any other blessing
Main Weapon: Blowpipe > Dragon Crossbow > Rune Crossbow (Seriously, buy the blowpipe)
Chest: Blessed D’Hide > Black D’hide - Karil’s also works, but the Blessed D’Hide is awesome for the prayer bonus.
Leg slot: Again, Blessed D’Hide is just awesome, for the prayer bonus - if you can’t wear it, Black D’hide or Karils again also works.
Gloves: Barrows Gloves > Blessed D’Hide Vambraces
Ring: Archers Ring (i) > Archers Ring (don’t be like me, imbue your rings)
Boots: Blessed D’Hide > Black D’Hide (If you for some reason have ranger boots and not Blessed D’Hide, use ranger boots)
* Only use Slayer Helmet if you are on task
In the blowpipe adamant darts are more than sufficient, make sure you have a few thousand charges ready.
The Inventory
Your inventory is going to consist primarily of Saradomin Brews and Super Restores, you can also bring prayer potions.
A good start will be something like this:
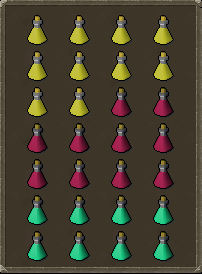
Edit: I completely forgot to add Bastion potions in the mix, I would probably drop a two Prayer Pots and put in two Bastion Potions instead, the Ranging bonus and defense bonus can come in very clutch!
Overall the inventory is very flexible, and you may change it as you try and fail to get through the caves, you might realise that you don’t need all the sara brews and can bring a few more prayer pots, or you might realise you need less prayer pots and more restores, it’s all up to how you feel is the best.
Now besides just potions there are a few items you can bring that will help you through the fight caves.
First let's get the expensive option out of the way.
The Saradomin Godsword (SGS for short) will help you restore life and prayer throughout the fight caves.
Secondly, if you’ve completed the Rum Deal quest you also have access to the holy wrench, it will allow for each prayer pot to restore just a little more prayer, making this a very useful item.
The Challenges you will face
You’ve now got your gear setup, let's talk about the different monsters you will face throughout the caves.

Tz-Kih (Lvl 22), or as I call them bats, are the weakest of all the enemies, the first one spawning at wave one and has a relatively low max hit of 4. However these guys drain prayer while they are meleeing you so these are of utmost priority to kill.

Tz-Kek (Lvl 45), or Blobs are the second weakest enemy, the first of which you will face on wave 3. They will melee hit you and have a max hit of 7, however they are very inaccurate and they are very low priority. They can also be used as a safe spot for one of the monsters I will mention later.

Also, Tz-Kek (Lvl 22), two of these spawn when you kill the red blob, again these are very weak and are not hugely important to kill, they have a max hit of 4.

Tok-Xil (Lvl 90), or the Rangers are the first dangerous mobs that spawn. These will spawn on wave 7. They can max hit up to 13 and can do a lot of damage quickly making them a relatively high priority to kill.

Yt-Mejkot (Lvl 180), or the Melee mobs are very dangerous and you should never let them hit you, as they can max hit up to a 25, but can also heal other monsters. You will be safespotting these most of the time.

Ket-Zek (Lvl 360), the magers, the really dangerous foes, which can max hit up to a 54. While these are up, you will always have Protect from Mage on as these can end a run very quickly if you get hit. They can also Melee, but ideally you will NEVER get in melee range of them.

Big Boy TzTok-Jad, or simply Jad. This is why you are here, to defeat this monster at the end of a long fight. Has a massive Max hit of 97 and hits with all three combat styles. So how do we defeat him? Prayer flicking, and Nerve Control.

Yt-HurKot, or healers, spawn when Jad reaches 50% and will heal Jad unless dealt with. We will get to that later.
How do the caves work?
So now you know what you will face, now we will get to the how. The caves consist of 63 increasingly difficult waves. The way the waves get tougher is that it adds one more monster each time. The way it does this is simple addition.
Wave 1: Level 22 Bat
Wave 2: 2x Level 22 Bat
Wave 3: Level 45 Blob
Wave 4: Level 45 Blob and Level 22 Bat
Wave 5: Level 45 Blob and 2x Level 22 Bat
Wave 6: 2x Level 45 Blobs
Wave 7: Level 90 Ranger
So these are just the first seven waves, but essentially it goes in cycles, and then the monsters ‘add up’ to a bigger monster each wave. Once you start to recognize what monsters will come up next without looking up the waves, you will find that the caves will become a lot easier to deal with. At least up until the last few waves.
Here is a link to the Wiki, which has a complete wave layout: https://oldschool.runescape.wiki/w/TzHaar_Fight_Cave#Wave_breakdown
The Essentials
So here are a few things you need to know. Between wave 1 and 14, the only time you need to pray is when the ranger is alive. Once he dies, you can turn off your prayer to preserve as much as you can.
On wave 15, the first melee mob spawns, use the rock (see below) to safespot him while you kill off the rest of the wave. If you need to, you can turn on protect from Melee and run through him, but only as long as you are sure that Mage can’t hit you. This can be difficult, and sometimes a precise flick to protect from melee and back to protect from mage can be required. You can also use the blobs to safe spot the melee mob, if you can get a blob between you and the melee mob, remember that if you kill the blob you will effectively have 2 barriers in front of you that you can use to safespot the melee mob..
The waves now repeat with a melee mob on every wave up to and including wave 30, once it dies you want to make sure you turn on protect from mage immediately as from now on you will be dealing with a mage all the way till the end. The only times you turn off protect from mage is when either the mage is dead or the mage is safespotted. It can be needed to quickly flick protect from melee to safespot a melee mob.
The Trick
Okay Viku, thanks, you’ve given me a layout of the monsters, but I can find all of this on the wiki, how does this help me beat the caves?
I will show you.
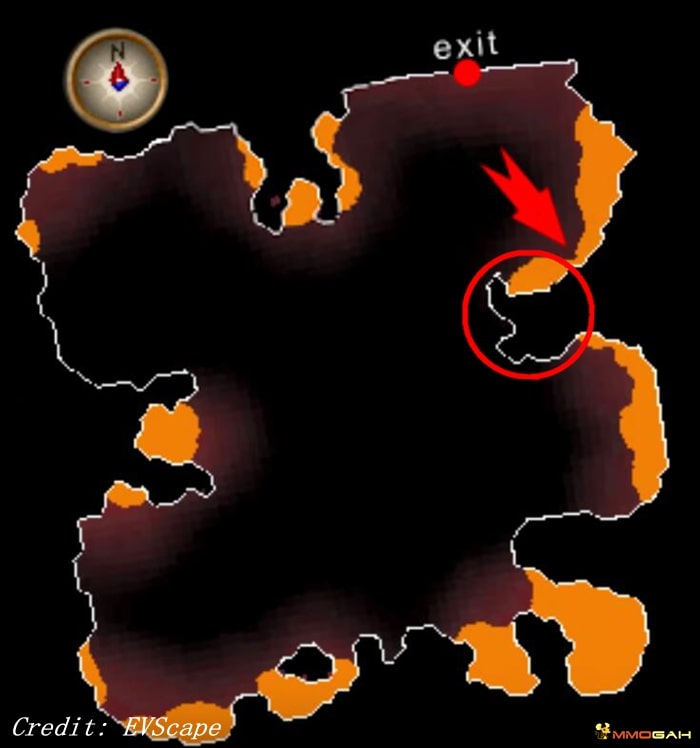
That rock will be your rock. You can use this rock to safe spot all monsters. Start where the arrow is pointing every wave and the rangers and mages will mostly be in range when they start attacking. Melee coming right at you? Pray Melee and run through him and around the corner *BOOM* Safe spotted. Mage spawned on the opposite side? *BOOM* SAFEPOTTED!! Ranger out of range of the rock? Run to the other side of the rock and he will be coming straight to you! This rock is love, this rock is life and if you learn to use it, you will find that the waves become increasingly trivial.
Does this mean that it’s an automatic win? No, no it doesn’t, but it helps you to be able to ‘Solve’ the puzzle that each wave inevitably is.
The only time you will leave the rock is wave 62 which is the wave before Jad, that will spawn 2 Mages.
Wave 62 and Wave 63 (Jad)
So you have now made it to wave 62 this is where the nerves are starting to set in. It’s important that once wave 62 starts you run to the middle and take note of where the Orange Mage spawns, this is where Jad will spawn. Kill the red Mage and get the orange Jad low, get to full prayer, turn on Rigour or Eagle Eye, and when you are ready kill it and Jad will spawn.
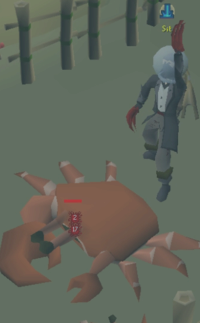
Big Boi Jad
Jad, oh the mighty Jad, you are so nervous you can barely keep it together. And that, is your biggest enemy. The easiest way to beat this fight is to try and be as relaxed as you can, though not too relaxed!!
Jad primarily uses two moves.
The first is where he rears up on his hind legs, his forelegs hanging in the air for a few moments. This indicates that he is using a mage attack and as soon as you see this you need to switch to the Protect from Mage prayer, failure to do so will most likely result in a quick death.
The second attack, Jad also lifts his forelegs, but this time he will slam them down quickly, this indicates that a ranged attack is incoming. Quickly switch to protect from ranged and you will also completely nullify this attack.
And that’s the hard part. Keeping your concentration, with the heart beating fast and making sure to switch those prayers. It’s not easy, you will most likely fail a few times, but that is okay.
Now when Jad hits 50% the 4 healers will spawn, these will rush to heal jad. You must attack these to take away their attention from Jad, I personally try to aggro all 4 of them and then kill them 1 by 1. If Jad gets healed to 100% he will spawn adds at 50% again, so it’s important that we don’t let Jad get back to 100%
And now you might be thinking ‘But Viku, this is insane, how am I supposed to do all of that and still keep flicking the prayers?’
Well I have a self imposed rule. 1 Prayer, 1 Action. Look at Jad, check what is doing and flick the prayer and then I do 1 action. The action can be attack a healer, OR drink 1 sip of brew, OR 1 sip of restore, OR 1 sip of prayer and then be ready to swap prayer again. (I STRONGLY recommend you use the F keys to swap between inventory and Prayers)
If you do this, you will find you have plenty of time to flick the prayers.
Outro
Alright so I think that's everything, as mentioned previously, I am by no means an expert, and it may be that I am way too early to make a guide like this, however recently I saw some clannies talking about going through or having trouble with the fight caves and I figured I would share my experience and how I went about it.
If I missed something, lets be honest I probably did, then feel free to reach out in the post below or directly to me.
Last edited by twobviku on Thu Jun 25, 2020 2:17 am; edited 2 times in total

twobviku- Posts : 92
Reputation : 13
Age : 31
Join date : 2019-06-24
Re: The Fight Caves - An Overview
![]() by Avallan Wed Jun 24, 2020 9:18 pm
by Avallan Wed Jun 24, 2020 9:18 pm
wow, this is an awesome guide, thanks for taking the time to write it up, it's been years and years since I did Jad and I haven't bothered venturing back there with this account as I still have very awful memories of it, my nerves definitely let me down a lot way back in the day lol

Avallan
- Posts : 502
Reputation : 46
Join date : 2019-07-04
Re: The Fight Caves - An Overview
![]() by Syllabic Thu Jun 25, 2020 2:14 am
by Syllabic Thu Jun 25, 2020 2:14 am
Dude. This is absolutely outstanding! Extremely well formatted, and informative without being a boring info dump. Definitely going to start directing people to this guide when they're going for their first cape 
As it stands, I'd only make two changes. The first would be to bring a couple ranging/bastion potions. In my opinion, these are almost non-negotiable. You're gonna need that extra damage, and I personally don't see many runs where the deciding factor ends up being the one or two brews/restores that would have occupied that space otherwise.
The second thing is way more optional, but something I also found very helpful was to bring along a couple anglerfish. They're very nice for healing during the Jad fight itself, especially if you have trouble managing too many things at once. Provides overheal similar to a sara brew, but you don't need to sip a restore afterwards, which allows you to continue to focus on prayer switching/healer tagging instead.
Aside from those minor quibbles, really great writeup. Would definitely love to see more guides like this in the future, if you're at all interested!
_________________

Syllabic
- Posts : 1958
Reputation : 326
Join date : 2019-06-30

Re: The Fight Caves - An Overview
![]() by twobviku Thu Jun 25, 2020 2:16 am
by twobviku Thu Jun 25, 2020 2:16 am
Syllabic wrote:Dude. This is absolutely outstanding! Extremely well formatted, and informative without being a boring info dump. Definitely going to start directing people to this guide when they're going for their first cape
As it stands, I'd only make two changes. The first would be to bring a couple ranging/bastion potions. In my opinion, these are almost non-negotiable. You're gonna need that extra damage, and I personally don't see many runs where the deciding factor ends up being the one or two brews/restores that would have occupied that space otherwise.
The second thing is way more optional, but something I also found very helpful was to bring along a couple anglerfish. They're very nice for healing during the Jad fight itself, especially if you have trouble managing too many things at once. Provides overheal similar to a sara brew, but you don't need to sip a restore afterwards, which allows you to continue to focus on prayer switching/healer tagging instead.
Aside from those minor quibbles, really great writeup. Would definitely love to see more guides like this in the future, if you're at all interested!
Thanks a lot of the encouraging words! Never written a guide before so I was a little worried!
You are absolutely right about the Bastion Potions, I completely forgot! Will make sure to edit that immediately!
twobviku- Posts : 92
Reputation : 13
Age : 31
Join date : 2019-06-24
Re: The Fight Caves - An Overview
![]() by This Land Thu Jun 25, 2020 2:43 am
by This Land Thu Jun 25, 2020 2:43 am
An absolutely beautiful guide Viku! 
Honestly... whenever you do anything it always puts a massive smile on my face and I will most certainly be using this guide when I hit up the Fight Caves for round 2 and, hopefully, beat Jad and claim my awesome cheese cape
Keep being amazing mate, you're a gem!
P.S. Was awesome bumping into you by chance in MMORPG's live-stream the other day, it made my day seeing you pop up in the chat @'ing me!

This Land- Posts : 396
Reputation : 45
Age : 28
Join date : 2019-09-18
Re: The Fight Caves - An Overview
![]() by twobviku Thu Jun 25, 2020 3:13 am
by twobviku Thu Jun 25, 2020 3:13 am
This Land wrote:An absolutely beautiful guide Viku!
Honestly... whenever you do anything it always puts a massive smile on my face and I will most certainly be using this guide when I hit up the Fight Caves for round 2 and, hopefully, beat Jad and claim my awesome cheese cape
Keep being amazing mate, you're a gem!
P.S. Was awesome bumping into you by chance in MMORPG's live-stream the other day, it made my day seeing you pop up in the chat @'ing me!
Thanks Mitch! I really appreciate your amazing words of encouragement!
And yes running into you in MMORPG's stream was an awesome surprise!
twobviku- Posts : 92
Reputation : 13
Age : 31
Join date : 2019-06-24
Re: The Fight Caves - An Overview
![]() by Muffin Thu Jun 25, 2020 8:18 pm
by Muffin Thu Jun 25, 2020 8:18 pm
Great guide, going to turn to this when I grind the mini Jad pet <3 it's been a while since I've last entered the Caves!
_________________
I'm delicious AND nutritious!


Muffin
- Posts : 234
Reputation : 28
Join date : 2018-11-08
Re: The Fight Caves - An Overview
![]() by COCOMARBELLA Tue Jun 30, 2020 5:54 am
by COCOMARBELLA Tue Jun 30, 2020 5:54 am
this is an amazing thorough guide and I will definitely be going back to this once I woman up and taken on the fight caves myself! lol but im gonna wait til ive maxed all my combat!  but awesome guide thank you!

COCOMARBELLA
- Posts : 412
Reputation : 28
Age : 30
Join date : 2019-07-19
Re: The Fight Caves - An Overview
![]() by Guitarist141 Thu Jul 09, 2020 12:22 am
by Guitarist141 Thu Jul 09, 2020 12:22 am
Hey Viku 
Very nice guide. I'll be going in on my rune dragon alt (probably tomorrow) to get the fire cape.
Another option (that I will be using) is Karil's set. For people below 75 range for blowpipe, Karils is a lot faster and kills faster than the rune/dragon crossbow. And, you can hit magers from the safespot that a BP cannot. So, you conserve your prayer supplies and it tends to outweigh the +1 prayer bonus from the blessed armor pieces.
That aside, mechanics will kill you, gear choice will just speed up or slow down your victory And your mechanics are well written. 100% right about the rock; if you properly use the rock to safespot enemies it makes the caves much, much easier.
Thanks for the time to write it out I appreciate the refresher before I go in tomorrow.
Very nice guide. I'll be going in on my rune dragon alt (probably tomorrow) to get the fire cape.
Another option (that I will be using) is Karil's set. For people below 75 range for blowpipe, Karils is a lot faster and kills faster than the rune/dragon crossbow. And, you can hit magers from the safespot that a BP cannot. So, you conserve your prayer supplies and it tends to outweigh the +1 prayer bonus from the blessed armor pieces.
That aside, mechanics will kill you, gear choice will just speed up or slow down your victory
Thanks for the time to write it out

Guitarist141- Posts : 170
Reputation : 14
Join date : 2020-02-02

Re: The Fight Caves - An Overview
![]() by Guitarist141 Fri Jul 10, 2020 7:49 am
by Guitarist141 Fri Jul 10, 2020 7:49 am
I used the Jad safespot method from this video. When you set it up, the healers spawn behind Jad. Hit them one-by-one and they are trapped behind/next to him. Then it's up to you to pray flick your way to fire cape!!
https://www.youtube.com/watch?v=TlIQ9q2FPM0


Guitarist141- Posts : 170
Reputation : 14
Join date : 2020-02-02
Re: The Fight Caves - An Overview
![]() by COCOMARBELLA Fri Jul 10, 2020 1:21 pm
by COCOMARBELLA Fri Jul 10, 2020 1:21 pm
wooooooo yes well done guitarist so happy you got it haha loved your stream I fell asleep watching it haha was great.
COCOMARBELLA- Posts : 412
Reputation : 28
Age : 30
Join date : 2019-07-19
Re: The Fight Caves - An Overview
![]() by Matt Ross Fri Jul 10, 2020 3:40 pm
by Matt Ross Fri Jul 10, 2020 3:40 pm
Really great Guide, good formatting with images goes a long way
& Congrats Guitarist!
& Congrats Guitarist!

Matt Ross- Posts : 613
Reputation : 34
Join date : 2017-09-19
» Fight Caves Tips?
» [Request] Fight caves guide with blowpipe
» AK Void's Fight Pits Showcase and 99 Strength & Fire Cape Party!! - 5/10/2020 4PM EST
» [Request] Fight caves guide with blowpipe
» AK Void's Fight Pits Showcase and 99 Strength & Fire Cape Party!! - 5/10/2020 4PM EST
Page 1 of 1
Permissions in this forum:
You cannot reply to topics in this forum